It’s been a hot minute since our last post on Cycling Performance Testing and Training, but hopefully you have managed to wrestle the maximal output demons and put some numbers down on paper.
Now it’s about putting those numbers into practice. In particular, looking into just how we can organise our training to target different adaptations depending on what we need to take our cycling to the next level. Here we cover the next steps, Cycling Performance Training Zones.
As a recap or if you missed our previous articles, check out Todd’s Pedal Performance stories. Read more about testing and finding your numbers here. Todd gives more detailed insights into finding your training zones for power and HR.
Before we dive into the Bike Chaser guide to all things training zones, it is really important to remember a key principle when utilizing training zones and that is that zones are at best just a guide. They are not exact.
Your body does not know the difference between a written number such as 91% and 92%. So let’s not get hung up with if we are out by a few percentage points. Depending on how much sleep you got or what day of the week it is, these zones can slightly shift anyways. As long as we are in somewhat of a ballpark, you will be ok.
Before we launch into the full detail a quick overview of Zones, as we all know everyone is different, and all of this should be used as a guide only.
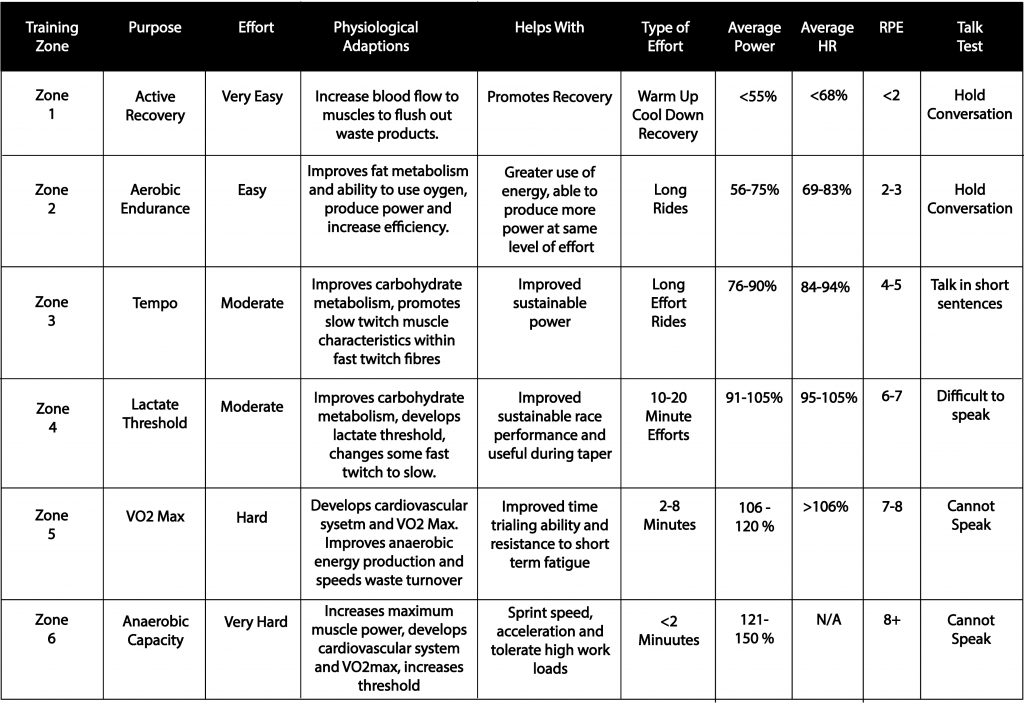
In this instance we have decided to work with 6 training zones and given an average Power and Average HR % to work with. Lets get into your cycling performance and training zones.
Zone 1
This is generally considered a light warm up or cool down. If working with power you will be working at less than 55% average power, with your heart rate at and average less than 68% of max.
Working in zone 1 increases blood flow and is ideal to flush out waste products from muscles – its perfect to help promote recovery.
Zone 2
Once we move into Zone 2 we are moving from Active recovery into Aerobic Endurance – This is normally used over a long steady ride where you will be able to sustain this output for a long period of time.
Zone 2 tends towards a greater use of energy over a longer period its perfect to improve fat metabolism and your bodies ability to use oxygen. Spending some quality time in zone 2 over time additions will be seen in your ability to produce consistent power over a longer sustained period of time with an increased efficiency.
Zone 3
This zone now moves from an easy effort into a more moderate effort, a tempo type pace that works to sustain long rides with a few efforts. At this stage you should still be able to talk in short sentences.
While working in Zone 3 you will be improving your bodies use of carbohydrates as your metabolism increases. Your also working on promotion of the slow twitch muscle characteristics within fast twitch fibres. Ideally suited when working on improving your sustainable power over time.
Zone 4
Continuing to work at a moderate type effort you will be aiming to work at around 90% to 105% of your average power and 95% to 105% average heart rate. At this stage it should be more difficult to speak. The work is usually done over 10 to 20 minute solid efforts.
Zone 4 is going to contribute to improvement in your sustainable “race” performance, and is often used during the taper period. Adaptions from zone 4 as the effort increases continues to work on improvement of carbohydrate performance along with now promoting and starting to develop lactate threshold changes.
Zone 5
Its getting real at this stage, you cannot speak with and hitting this working range is achieved by hard efforts that last around 2 to 8 minutes. Average power and average heart rate are now working hard. Average power would be in the range of 106% to 120%, average heart rate is greater than 106%.
Training well into zone 5 will see you improving your longer term power outputs so think “time trialing” head down and pushing hard on the pedals. With this in mind benefits over time you will be helping to improve your resistance to short term fatigue. Your physiological adaptions, well your now focused on developing the cardiovascular system and improvements in your V02 Maximum. Your body is training and improving your anaerobic energy production while it speeds up the waste turnover in your system.
Zone 6
ok, now your working at full anaerobic capacity; your heart rate reference – well at this stage “it is what it is”, average power pushing hard and high at 120% to 150% these are really hard efforts and less than 2 minutes so consider this all out – the sprint finish if you will.
Needless to say at this point you won’t be speaking (out loud anyway) your working on your sprint speed and acceleration, while doing this your getting used to the feeling of higher workloads. The benefits from this zone; increase your muscle maximum power outputs while development of your cardiovascular system continues and with time your V02 Max threshold increases.
How do I calculate my average Power:

First, subtract 5% from your FTP Test average output number. This result will be an accurate estimate of the average output you could hold for 60-minutes (i.e. your FTP).

For example, if your average output is 115, find 5% (115 X 0.05 = 5.75), then subtract it from the total number (115 — 5.75 = 109.25)
Don’t be overwhelmed or intimidated
We can become so intimidated by all the numbers that sometimes we don’t even start the process. With any luck, our below guide will simplify the process so you can understand just what each zone means from the adaptations it can elicit, to how much you should be able to talk whilst in each zone. To build on your cycling performance working in training zones will help build structure to your rides and maximise your time on the saddle.
Training Zone Guide
In our next article, we are going to start to experiment with these zones and how they fit into your training program, and heres some links to Todd’s other articles.
So as we get into writing that one, get out there and put the training zone guide to the test. Feel free to drop Todd a note below.
Todd has spent his entire life on some form of two-wheeled sled. From lugging a shovel around on the handlebars of his BMX as a kid to mountain biking and road as he matured, if it’s had two wheels, he has done some skids on it.
Todd Jones Pedal Performance
Having spent time working within the bicycle retail industry and also completing countless bike fits, he has since obtained a Bachelor’s in Sports Science along with a Masters in Strength & Conditioning to complement his time spent within National and Olympic level sporting organizations. He has a keen interest in overall Health and Well-being with the greater aim of using the bicycle as a vehicle to give back to the community.