Having your bicycle seat positioned correctly will not only make you feel more comfortable on your bike, it will also enhance your power output and help to prevent injury. Adjusting your bike saddle comes down to height, angle and fore-aft positioning. This article will provide you with what you need to know to perform your own basic bicycle seat adjustments. Here we’ll also cover why we always recommend a professional bike fit for serious cyclists.
You’ll need the following utensils to adjust your bicycle seat position: a spirit level, a plumb bob and a helper (a human being). If you don’t have a plumb bob, you can use a string with a weight tied at the end. An indoor trainer will also be useful but you can get by if you don’t have one readily available.
Saddle angle
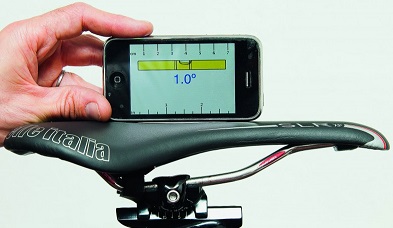
Make sure your saddle is angled correctly before you adjust the height and fore-aft position. Adjusting the angle is quite simple: the general rule is that your seat needs to be level because it holds your pelvis in place while you pedal. Use the spirit level to make sure your saddle is angled correctly as shown below. A note of caution here: make sure the bike is on a level surface when you make this adjustment, otherwise your spirit level will be misleading!
You may feel like tilting the nose down a little because it seems more comfortable at first but you will likely regret this once you’ve been on the bike for a longer period. If your saddle is tilted down you’ll transfer unnecessary weight and pressure to your knees, arms and shoulders because you’re leaning into them.
Pay attention to how you feel on the bike. If your saddle is tilted slightly (even just a few degrees) and you find yourself sliding forwards or sitting on the front part of the saddle you’ll need to adjust it. A common reason for tilting the seat is to remove pressure from the groin. If you’re feeling pain or numbness in the groin you may need a different saddle instead.
If your saddle is tilted too far up, your pelvis will tilt backwards which can cause lower back pain and discomfort in your hip. It is also very likely that you’ll feel groin pain or discomfort.
Adjust the angle of your bicycle seat in small increments (half a degree at a time) and make sure you have a seat that fits your body. Your local bike shop will be able to help you assess whether you have a good saddle for you.
Saddle height
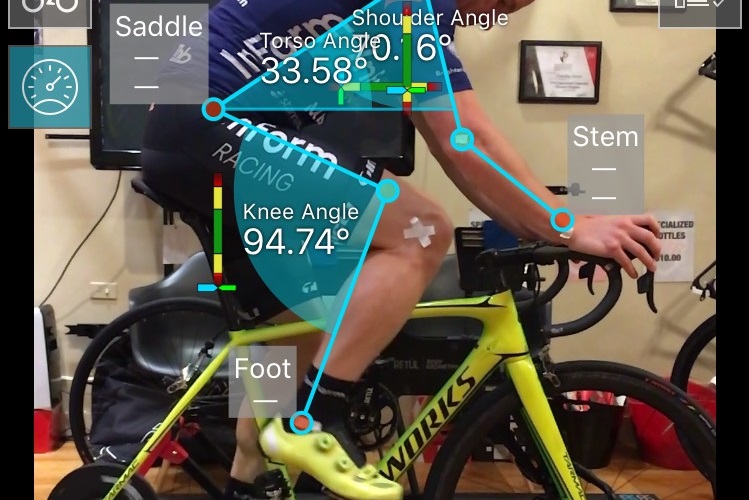
At the bottom of the pedal stroke your leg should be bent about 30 degrees with your pelvis level and the ball of your foot over the centre of the pedal. To verify your 30 degree angle, put your heel on the pedal and pedal backwards. Your leg should then be straight at the lowest part of the stroke.
Pay attention to your ankle position when adjusting your saddle height. At the bottom of the stroke, a toe-down ankle posture will be a sign of an overly high saddle whereas low heels and limited ankle range of motion will suggest that the seat is too low.
Fore-aft positioning
Fore-aft positioning relates to the distance between your seat and handlebars. The fore-aft position is important because it affects how different muscle groups are activated through your pedal stroke as well as how much pressure is put on your knees. Generally speaking, if you move your saddle backwards, you will increase hamstring engagement and if you move your saddle forwards, you will put more load on your quads.
A generally accepted way to adjust fore-aft saddle position is called the Knee Over Pedal Spindle method (KOPS). As the name suggests, this method is designed to align your pedal with your kneecap when your pedals are in neutral position.
To find the right fore-aft position, sit on the bicycle with the pedals at 9 o’clock and 3 o’clock (neutral position). As you hold the plumb bob in front of your forward kneecap, the string should intersect the pedal spindle. This method obviously doesn’t take into account your individual physique, riding style or flexibility. In other words, it is practical as a guide but you may need a slightly different setup.
The video below will give you a visual overview of the bicycle seat adjustment methods outlined above.
Why we recommend professional bike fits
If you go for long rides, use cleats or simply want to optimise your power output through your pedal stroke, it is recommended that you get a professional bike fit. Having the right bike setup is paramount for injury prevention, optimal power output and general comfort on the bike.
Moreover, no cyclist is the same. You may have a tilted pelvis, one leg slightly longer than the other or your flexibility (or the lack thereof) might require your saddle to be positioned differently. At the same time, your seat position is just one part of your overall setup. Your whole bicycle setup needs to fit your body for you to feel truly at one with the bike.
There is a huge selection of professional bike fitters out there so it can be difficult to choose where to go. We have shared our experiences with professional bike fits in the articles below, you may find these useful.
Leave a Reply
![]()
![]()
![]()
![]()
One thought on “How to adjust your bicycle seat position”