In this the second of a a two part article Todd Jones will continue to provide insights into the mystery of the bike fit.
Bike fitting is the process of adjusting a bike for a cyclist to optimise their comfort, performance and efficiency. A Bike fit aims to prevent injuries, increase efficiency, comfort and improve performance for all cyclists.
The Bike Fit – Part Two
If you haven’t already read part one of the bike fit series, we recommend having a read of it now to get familiar with the general philosophy behind finding YOUR bike fit bandwidth before we get into the specifics within part two here.
Over the course of history, the bike fit has always come down to three points of contact;
Glutes (or bum as more commonly known)
Hands
Feet.
If fit improperly, these three touch points can be sources of pain, numbness, or tingling as a result of nerve-related compression or blood flow related issues.
The sum of all three contact points interact with each other and also go a long way towards developing our overall “balance” on the bike and finding the sweet spot between power and handling. For example, if we have the overall balance is too far towards the back of the bike, it can become difficult to control the front end whereas if our weight is too far forward we begin to see issues at the hands, wrist, and elbows due to excessive weight and pressure through the region.
Bandwidth
Ultimately, when organizing ourselves within our bandwidth, we are adhering to the “Goldilocks Effect’, that is, some sort of mid-range. Not too high, not too long, not too long and not too short. We are searching for what is appropriate and achievable for each and every rider.
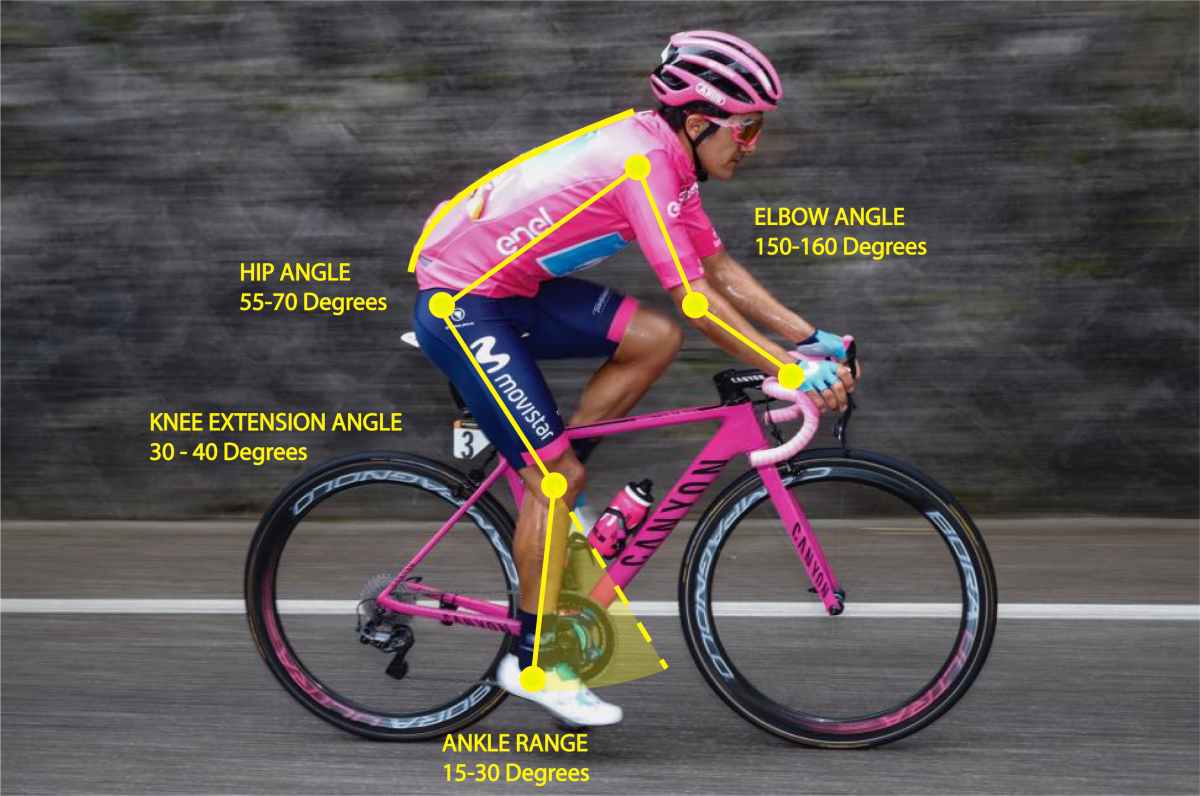
In part one, we spoke at length to the fact there is no single best method or fit, rather bandwidths. In the image below, you can see some of the bandwidths we try and stay within for beginner to intermediate level cyclists.
So let’s get stuck into how best to go about finding your bike fit bandwidth with two main focuses in that of the engine room (saddle and pedals) and the cockpit (handlebars).
Cleat Position
Much like Drake, we are going to start at the bottom and work our way up. Our feet are the most locked in aspect of our bike fit and leave little room to move throughout a pedal. We also see many issues further up the chain if we begin with improper cleat alignment so it’s wise to begin at the bottom.
If our cleats are positioned too far forward (which places the foot further behind the pedal) it can create achilles issues. The further the cleat is away from the heel the greater the requirement from the calf to create power into your machine. Some folks may either lack sufficient strength or flexibility in the baby cows (calf’s) which then creates an increased workload on the achilles tendon which it becomes none too happy about.
Positioning the cleat closer to the middle of the foot spreads the load and can also reduce the opportunity for the dreaded hot spots to manifest themselves.
Measurement
To ensure your cleat is properly aligned;
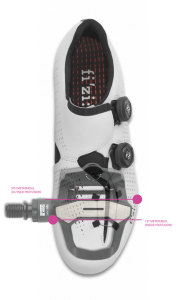
Whilst your cycling shoe is on, find the bony protrusions (sticky out bits) on either side of the foot. Mark these spots. Draw a straight line between these two spots and centre the cleat within the two lines as per the diagram below.
From here we need to establish your natural stance and align the cleat as such. To do so, in bare feet, simply march, jog, walk on the spot for anywhere between a minute to two, thinking about your favourite cycling related memory. It could be your first bike, it could be the first skid you ever did or maybe it’s the last time you were swooped by a pesky magpie, whatever it is, as the great poet Enimem once said, “you need to lose yourself”.
Once you have lost yourself whilst walking on the spot, stop immediately and don’t move a single millimetre. Look down at your feet and take notice of where your toes are facing. Are they pointing, in, out or simply straight ahead? It doesn’t matter as it’s individual to each person but we need to align your cleats as per your normal stance otherwise all matter of problems can stem from locking yourself in a position that is not natural to you.
Align your cleat with the slight angle of your natural stance, so if your toes point in a little, align the cleat as such. If they point out, align the cleat so it points slightly outwards. There is a time and place to address the mechanics behind why your toes face the way they do, altering a bike fit to lock you into an unnatural position is not one of those times, nor those places.
Saddle Height
Saddle height is the holy grail behind bike fit, many other fit related issues can stem from an ill-positioned saddle. It is to this that after we have set our feet, we go directly to setting up the saddle. When it comes to the height of the saddle, we are dictated by the knee, in particular, the angle of the knee at the bottom of the pedal stroke.
As saddle height increases, so does the power generated by a rider until it reaches a point of diminishing return and thus the power starts to decrease again (purely because we start to lose contact with the pedal).
We want to go as high as possible with the saddle without the knee reaching full lockout (extension) at the bottom of our pedal stroke but for most of us, hamstring flexibility will be the issue. Part of the hamstring muscle group runs over the hip, so as we sit on our machine, the hamstring gets in a stretched position over the hip at the top end then as such, if we lack flexibility, it affects how much we can stretch the knee out in full extension towards the other end of our hamstring. Thus we have to gradually increase our saddle height as we increase our hamstring and surrounding musculature flexibility. One thing to remember throughout a bike fit and it holds no harder truth than when it comes to saddle height, “the bike is adjustable and the rider is adaptable”.
At the other end of the spectrum, if we go too low in saddle height which is common for many newcomers to the cycling game, we can run into all sorts of problems at the knee as the compressive forces increase. Many folks find it easier in a lower position to begin with simply due to the fact they can use their quads to a much higher degree and a greater sense of balance. But too high of input from the quads alone for a continuous duration will eventually become an issue for most riders in the form of knee pain.
Saddle Height Measurement
As we spoke about in part one, there are numerous amounts of methods when it comes to finding your bike fit bandwidth but we are going to assume that we do not have access to either a professional bike fit professional or the equipment to perform most of the at-home solutions such as a bike trainer, goniometers etc. We will also start at the safer end of the fit spectrum before edging our way to the performance end, we would prefer to undershoot than overshoot on many of the fit variables, simply due to safety.
Saddle height can be a tough one to figure out by yourself but ultimately we are aiming for the following metric;
When our pedal is at the bottom of the stroke, we want our knee to be anywhere between 30-40 degrees off of that of a straight leg (refer to the diagram of Richie Caparaz) or in much simpler terms, we want a little bit of bend in the knee at the bottom of the stroke.
As most of us will pedal with a toes pointed down approach, we can find our starting position;
Go for a short ride around the block to ensure you are pedaling as you normally would, this is critical. As some folks seem to think as soon as they enter into a bike fit, that they are going to completely change their pedaling technique, thus throwing out the entire fit.
When you return, whilst sitting on the bike and trying your absolute best to mimic the position you would spend most of your time in, place your heel on the center of the pedal and spin backwards until the pedal is at the very bottom of the pedal stroke (6 O’Clock)
If your leg is fully locked out or very, very close, then this should be a great starting position as once you place your forefoot on the pedal there will be a little bit of knee bend if done correctly.
It is important to remember, this is just a static measure, meaning we aren’t actually out on our machine and pedaling as per normal. So from here get out and spend a little time on your bike ensuring that when each pedal hits the absolute dead bottom of the stroke, that your leg is not completely locked out and has a little bit of bend in the knee but not too much, it’s the goldilocks approach.
Saddle Fore/Aft or Setback
After we have set the saddle height, we need to decide our saddle fore/aft or simply how far forward or back the saddle sits on the seat post. As with everything we have trade-off to consider, too far back and we diminish our power potential but too far forward and we can face issues at the knee which can lead to a lot of discomfort from short term and long term.
Fore/Aft Measurement
Finding the right position for our saddle is a little easier than saddle height when doing so alone, all we will need is some sort of long straight-edged object. We will be using the “Knee Over Pedal” (KOPS) measurement which is quite often butchered by beginner cyclists.
Ensure your saddle angle is level (we will touch on this more in the next portion of our bike fit).
After establishing a way to once again sit on the bike in the most natural position possible, we now bring the pedal stroke around to the 3 O’Clock position.
From here, we take the straight edge object, and starting at the boney part just below the kneecap, we let the object go straight down towards the ground.
We are looking to have the straight line intersect somewhere within the middle pedal (or slightly towards the front half of the pedal). If it intersects in front of the pedal, our saddle is set too far forward and we need to shift backward.
A reminder, it is critical to mimic your natural pedaling style as much as possible, including the ankle and foot position.
Pro Tip: Don’t be afraid to set up your camera to film you in these positions for you to analyse, it can be a lot easier than doing so whilst on the bike.
Saddle angle
Finally, at the saddle we have the angle which we mentioned in the previous section. Now this one there is very little room for movement, especially if you compete in UCI sanctioned events as the rules state your saddle must be level. Check out the film covering Graeme O’Bree’s tilt at the world hour record to understand more.
Fortunately, manufacturers of saddles work towards this rule and as such all saddles are designed to be ridden level but there are some instances where a slight angle forward may be required.
The only time we may look to angle the saddle ever so slightly down (between 0-2 degrees) is if you experience numbness in the genitals or if you are a mountain bike who is in and out of the saddle so often and finds themselves constantly hitting the saddle each time they sit down.
Rarely, if ever, should we see a saddle angle upwards, there is not really any performance or comfort benefit other than what may be somebody attempting to address the issue of sliding forward on the saddle which usually has to do other variables rather than saddle angle alone.
The Cockpit
How we set up the cockpit is far more about the feel and comfort of the rider rather than a perfected method. But we still do have some important variables to consider when setting up our front end.
Handlebars
Generally when it comes to our bars we want the hands in line with the shoulders when they are on the hoods. From my experience, whenever you ask males to find ‘shoulder-width’ they will overcompensate whereas females will under compensate for the width of their shoulders. If we go too wide with our setup we can get issues in the hands such as numbness and tingling and if we go too narrow we can create excessive fatigue on the triceps and a loss of handling performance.
If discussing bike fit bandwidth for the mountain bike population, we often see handlebars wider than that of their road counterparts, strictly due to the increased need for better handling performance.
Brake Levers
This is one of those tricky ones as most of us may not be familiar with how to adjust our brake levers to ensure the set up is correct. But too often a simple adjustment at the brake levers can tidy up many other fit related issues due to the rider not having to reach beyond their capabilities to be able to slow down their machine.
For many, aiming to have the tip of the brake lever in line with the handlebar drop is a great place to start. If your levers are sitting higher up or close to the flat section of your handlebars, you are probably compensating for poor fit somewhere else, in particular the stem may be set too long or bars angled too low.
Cockpit Measurement
The length and reach ultimately affect our torso position. This is one of our fit variables where our ego’s can get in the way of the most appropriate fit (believe me, from personal experience of my ego thinking I was ready for the pro peloton, they can definitely get in the way of correct bike fits). For the entry to intermediate cyclists, it’s recommended we have a torso angle anywhere between 45-55 degrees whereas the faster riders tend to be a little more aggressive in their position, owning anywhere between 45 and 30 degrees.
Once again, it’s wise to begin at the comfortable end of the spectrum rather than thinking you can get into a similar position to that of Caleb Ewan.
Other than our torso angle, which is still subject to your personal comfort, it is best to attack the setup of the cockpit with comfort in mind. It’s one of those areas where you will need to play around in and micro adjust but the touch points to consider are;
Aim to have a little bit of bend in the elbow so you feel relaxed whilst your hands are on the hoods. If your saddle is too high, the bars are too low or a combination of both your elbows want to straighten or lock out. If you were to relax your elbows in this improper position, you would feel excessive weight through your wrists and hands.
It should not be a strain on your neck and head to keep your eyes on the ahead. If you find this really uncomfortable there’s potential that your stem and positional length may be a little too long.
Don’t be too embarrassed if your initial bike fit has your sitting quite upright and facing into the wind, it would be like that for a reason if you have followed the above guidelines and your body has required you to set your bike more at the comfortable end of the scale. It won’t take long before you can begin to make micro adjustments within your bandwidth to increase performance. But first and foremost it’s of the utmost importance we can’t not ride due to injury from improper fit.
Whilst none of the above can replace the precision of a professional bike fit which I would always recommend, I hope this do-it-yourself guide may just give you a little more awareness of the effect that your position can have on your body and only increases your enjoyment out on your sled.
Todd has spent his entire life on some form of two-wheeled sled. From lugging a shovel around on the handlebars of his BMX as a kid to mountain biking and road as he matured, if it’s had two wheels, he has done some skids on it. Having spent time
Todd Jones Pedal Performance
working within the bicycle retail industry and also completing countless bike fits, he has since obtained a Bachelor’s in Sports Science along with a Masters in Strength & Conditioning to complement his time spent within National and Olympic level sporting organizations. He has a keen interest in overall Health and Well-being with the greater aim of using the bicycle as a vehicle to give back to the community. Find Todd on Instagram at